Week 14: Interface and Application Programming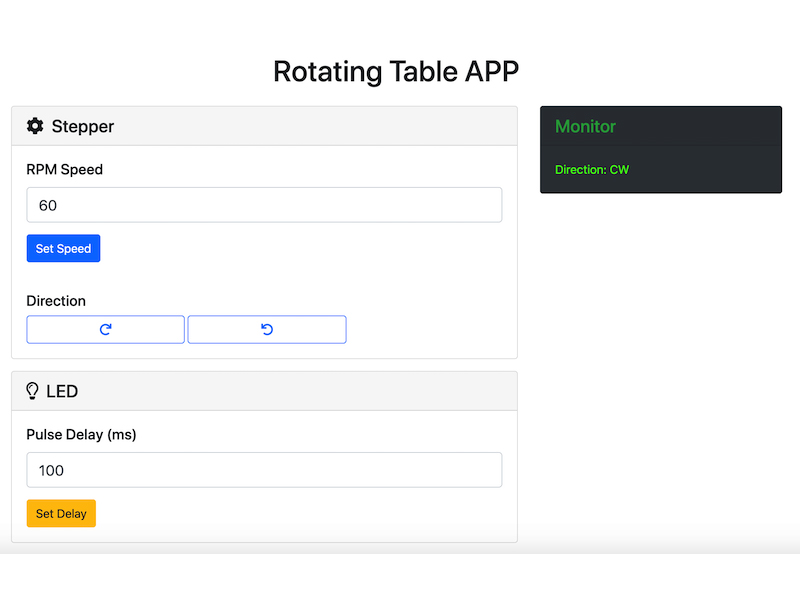
#Node.js #Johnny-five #Stepper Motor #Arduino
Assignments: (Group) 1. Compare as many tool options as possible. (Individual) 2. Write an application that interfaces a user with an input and/or output device that you made.
Published on: Sep 28, 2020Last updated on: Jan 12, 2021
Group Assignment: Compare as many tool options as possible
Link to Documentation Page
Individual Assignment: Stepper Motor + LED Control Panel
Features
-
Stepper
- RPM Speed: sets the RPM speed of the motor (ideal range: 50-3000 rpm, depending on the motor specification/datasheet)
- Direction: sets the motor to move clockwise or counterclockwise
-
LED
- Pulse Delay(ms): sets the blinkg speed of the LED
- Monitor: shows the respond after the user clicks a button or types a number

Hardware & Pin Connection
Learn more from Week 17: Mechanical and Machine Design
Software
- JavaScript
- HTML
- Boostrap(Documentation)
Installation
- Install Node.js
- Add and upload AdvancedFirmata to an Arduino board through Arduino IDE (installation)
-
Open the terminal and run the below commands in order
git clone https://github.com/cv47522/nodejs-j5-arduino-stepper.git cd path/to/repository npm i # install the required node modules automatically node webServer.js # start the server - Type http://localhost:3000 in a browser to go to the client-side control panel
Design
In order to quickly prototype a web application to control different kinds of output devices connected to an Arduino board through Serial Port. I adapted johnny-five node.js module which is an Open Source, Firmata Protocol based, IoT and Robotics programming framework written in JavaScript. Johnny-Five programs can be written for Arduino (all models), Raspberry Pi, Beagle Bone, etc. It also couples comfortably with popular application libraries such as Express and Socket.io.
Prerequisites (OSX)
- Install Node.js >= 0.10.x
- Install Xcode
- Add and upload AdvancedFirmata to an Arduino board through Arduino IDE (installation)
Node Modules
I started with creating an empty folder and named it nodejs-j5-arduino-stepper which will be installed related node modules by typing the following commands in order in the terminal:
cd path/to/nodejs-j5-arduino-stepper   # Go to the newly created folder
npm init   # Initialize the folder and create the package.json file
npm i johnny-five express socket.io socket.io-client serve-favicon  # Install related node modules
After successfully running the commands above, the package.json file will look like the following content:
package.json
{
  "name": "nodejs-j5-arduino-stepper",
  "version": "1.0.0",
  "description": "",
  "main": "index.js",
  "scripts": {
    "test": "echo \"Error: no test specified\" && exit 1"
  },
  "author": "",
  "license": "MIT",
  "dependencies": {
    "express": "^4.17.1",
    "johnny-five": "^2.0.0",
    "serve-favicon": "^2.5.0", // For customizing the favicon of the web application
    "socket.io": "^2.3.0",
    "socket.io-client": "^2.3.0"
  }
}
Folder/Directory Structure
Next, I created two empty files which were index.html and webServer.js respectively and moved them to the following directory:

nodejs-j5-arduino-stepper
├── public
   └── index.html
├── webServer.js
└── package.json
Functionality
webServer.js
In the webServer.js file, there are two main parts, the first one is by importing johnny-five node module, I can define which I/O pin I want to control through Serial Port.
The steps are:
- Destruct
Board,Led,Stepperproperties fromjohnny-fiveobject. - Create mutable variables (let datatype) to store changeable values:
led,board,stepper,speed(Default value: 180) - Instantiate a new
Boardobject and assign it toboardvariable. - Use the
board'sonfunction to listen to the Arduino state. - When Arduino is
ready, instantiate a newLedobject, assign it toledvariable, set it to pin13 and start blink it every 1 second. -
Instantiate a new
Stepperobject, assign it tosteppervariable and initialize it with the following parameters (J5 Stepper API):type: set the type toStepper.TYPE.DRIVERstepsPerRev: 200 steps per revolutionpins: set step pin to 12 and dir pin to 11
const {Board, Led, Stepper} = require('johnny-five');
let led, board, stepper, speed = 180;

board = new Board();

board.on('ready', () => {
    // init a led on pin 13, blink every 1000ms
    led = new Led(13).blink(1000);

    stepper = new Stepper({
        type: Stepper.TYPE.DRIVER,
        stepsPerRev: 200,
        pins: {
          step: 12, // pin 12
          dir: 11   // pin 11
        }
    });
});
For the second part which is the UI event control on a web page, by importing express, http (built-in) and socket.io node modules, I can control the stepper motor connected to the Arduino board with a custom visual web interface.
The steps are:
- Initialize a new instance of
express, instantiate its function toappconstant variable (const datatype). - Initialize a new instance of
httpby passing theappobject to be a function handler that we can supply to an HTTP server withhttp'screateServermethod which can turn my computer into an HTTP server, listen to ports on my computer and execute a function, a requestListener, each time a request is made. - Initialize a new instance of
socket.ioby passing thehttp(the HTTP server) object. - Initialize a new instance of
serve-favicon. - Tell
appwhere it can find andusethe favicon file, which homepage (index.html) to serve and which port (Here: 3000) to listen to.
// "Express" initializes "app" to be a function handler that you can supply to an HTTP server
const express = require('express');
const app = express();
const http = require('http').createServer(app);
// Initialize a new instance of socket.io by passing the http (the HTTP server) object.
const io = require('socket.io')(http);

const favicon = require('serve-favicon');
app.use(favicon(__dirname + '/public/img/favicon.png'));

// define a route handler "/" that gets called when we hit our website home
app.get('/', (req, res) => {
    res.sendFile(__dirname + '/public/index.html');
});

http.listen(3000, () => {
    console.log('listening on 3000....');
});
Following, in order to build the communication between UI buttons and the Arduino board. I adopted socket.io node module to achieve.
The steps of are:
-
Use the
io'sonfunction to listen to an event calledconnectionand start to do the specified arrow function with thesocketobject as the input parameter.Inside the arrow function (when a user open the UI webpage):
a. Print
a user connectedin the terminal once a user open http://localhost:3000 in the browser. Printuser disconnectedif the user close the browser.b. Listen to an event called
led, print the input data defined in the client side - index.html'ssocket.emit('led', {delay: tmp});within the<script></script>section. . If theboardobject is ready, blink the LED in the frequecy defined in thedata.delayproperty.c. Listen to an event called
stepper-speed, print the input data defined in the client side'ssocket.emit('stepper-speed', {rpm: tmp});. Assign thedata.rpmproperty to the global variable calldspeed.d. Listen to an event called
stepper-ccwand print the input data defined in the client side'ssocket.emit('stepper-ccw', {direction: 1});. .If theboardobject is ready, set the rpm to the value of thespeedglobal variable, rotate the stepper to go 2000 steps (10 full revolutions) counterclockwise and printDone moving CWonce the rotation is done.e. Do the same actions as the item d. but with the opposite direction.
// WebSocket Connection
io.on('connection', (socket) => {
    console.log('a user connected');

    socket.on('disconnect', () => {
        console.log('user disconnected');
    });

    // get light switch status from client
    socket.on('led', (data) => {
        console.log(data);
        if (board.isReady) {
            led.blink(data.delay);
        }
    });

    socket.on('stepper-speed', (data) => {
        console.log(data);
        speed = data.rpm
    });

    socket.on('stepper-ccw', (data) => {
        console.log(data);
        if (board.isReady) {
            // Set stepper to 180 RPM, counter-clockwise with acceleration and deceleration
            stepper.rpm(speed).ccw().accel(1600).decel(1600);

            // Make 10 full revolutions
            stepper.step(2000, () => {
                console.log("Done moving CCW");
            });
        }
    });

    socket.on('stepper-cw', (data) => {
        console.log(data);
        if (board.isReady) {
            // Set stepper to 180 RPM, counter-clockwise with acceleration and deceleration
            stepper.rpm(speed).cw().accel(1600).decel(1600);

            // Make 10 full revolutions
            stepper.step(2000, () => {
                console.log("Done moving CW");
            });
        }
    });
});
UI
index.html
The UI part is written in HTML which can create a webpage with multiple blocks/boxes. Since I applied Bootstrap's pre-defined CSS and Font Awesome's free icons, I added their CDN (online CSS files) to the <head></head> and the bottom of the <body></body> sections.
<!DOCTYPE html>
<html lang="en">
<head>
    <meta charset="UTF-8">
    <meta name="viewport" content="width=device-width, initial-scale=1.0">
    <link rel="stylesheet" href="https://stackpath.bootstrapcdn.com/bootstrap/4.5.2/css/bootstrap.min.css" integrity="sha384-JcKb8q3iqJ61gNV9KGb8thSsNjpSL0n8PARn9HuZOnIxN0hoP+VmmDGMN5t9UJ0Z" crossorigin="anonymous">
    <script src="https://kit.fontawesome.com/e80947895c.js" crossorigin="anonymous"></script>
    <title>Rotating Table APP</title>
</head>
Within the <body></body> section, I created the layout of the webpage with the Bootstrap's Grid System which can build responsive containers, rows and columns. The code below built the layout shown in the following image:

<body>
<div class="container px-5 mb-5">
<h1 class="text-center my-4">Rotating Table APP</h1>
<div class="row">
<div class="col-8">
<div class="card mb-3">
<h4 class="card-header"><i class="fas fa-cog"></i> Stepper</h4>
<div class="card-body">
<h5 class="card-title">RPM Speed</h5>
<input type="text" class="form-control form-control-lg" id="speedRpm" name="speedRpm" value="180" />
<button id="speedSet" class="btn btn-primary btn mt-3">Set Speed</button>
</div>
<div class="card-body">
<h5>Direction</h5>
<button id="cw" type="button" class="btn btn-outline-primary btn col-4"><i class="fas fa-redo"></i></button>
<button id="ccw" type="button" class="btn btn-outline-primary btn col-4"><i class="fas fa-undo"></i></button>
</div>
</div>
<div class="card">
<h4 class="card-header"><i class="far fa-lightbulb"></i> LED</h4>
<div class="card-body">
<h5 class="card-title">Pulse Delay (ms)</h5>
<input type="text" class="form-control form-control-lg" id="ledDelay" name="ledDelay" value="1000" />
<button id="ledSet" class="btn btn-warning btn mt-3">Set Delay</button>
</div>
</div>
</div>
<div class="col-4">
<div class="card text-white bg-dark mb-3">
<h4 class="card-header text-success">Monitor</h4>
<div class="card-body">
<p class="card-text" id="monitor" style="color: #45FF00;"></p>
</div>
</div>
</div>
</div>
<script src="https://code.jquery.com/jquery-3.5.1.slim.min.js" integrity="sha384-DfXdz2htPH0lsSSs5nCTpuj/zy4C+OGpamoFVy38MVBnE+IbbVYUew+OrCXaRkfj" crossorigin="anonymous"></script>
<script src="https://cdn.jsdelivr.net/npm/popper.js@1.16.1/dist/umd/popper.min.js" integrity="sha384-9/reFTGAW83EW2RDu2S0VKaIzap3H66lZH81PoYlFhbGU+6BZp6G7niu735Sk7lN" crossorigin="anonymous"></script>
<script src="https://stackpath.bootstrapcdn.com/bootstrap/4.5.2/js/bootstrap.min.js" integrity="sha384-B4gt1jrGC7Jh4AgTPSdUtOBvfO8shuf57BaghqFfPlYxofvL8/KUEfYiJOMMV+rV" crossorigin="anonymous"></script>Following is the UI event controller code written in the client side, which is used to communicate with socket.io node module in webServer.js. Each HTML element can be assigned to a unique id name such as ledSet, ledDelay, monitor, speedSet, etc. With the on function listening to certain user events like mouse (click, dblclick, mouseenter and mouseleave), keyboard, form and document/window events, I can define which action I want the UI to do such as printing messages in both the terminal and UI monitor as well as sending (emit) the value of a specific property to the specified sockey.io event created in webServer.js.
    <!-- important!! include socket.io client side script -->
    <script src="https://cdnjs.cloudflare.com/ajax/libs/socket.io/2.0.3/socket.io.js"></script>
    <script>
        //load socket.io-client and connect to the host that serves the page
        var socket = io();

        $('#ledSet').on('click', () => {
            // parseInt() function parses a string and returns an integer, the radix is 10 (decimal)
            var tmp = parseInt($('#ledDelay').val(), 10);
            console.log('Setting LED Delay: ', tmp);
            $("#monitor").text('Setting LED Delay: ' + tmp + ' ms');
            socket.emit('led', {delay: tmp});
        });

        $('#speedSet').on('click', () => {
            var tmp = parseFloat($('#speedRpm').val(), 10);
            console.log('Stepper Speed: ' + tmp + 'RPM');
            $("#monitor").text('Stepper Speed: ' + tmp + ' RPM');
            socket.emit('stepper-speed', {rpm: tmp});
        });

        $('#cw').on('click', () => {
            console.log('Direction: CW');
            $("#monitor").text('Direction: CW');
            socket.emit('stepper-cw', {direction: 0});
        });

        $('#ccw').on('click', () => {
            console.log('Direction: CCW');
            $("#monitor").text('Direction: CCW');
            socket.emit('stepper-ccw', {direction: 1});
        });
    </script>
</body>
</html>
Problem & Solution
The first stepper I used for testing the application rotated with shakes and noise. Initially, I thought it might be the problem of my code, but it worked well and smoothly after I replaced the original stepper with other steppers.
