Week 16: Wildcard Week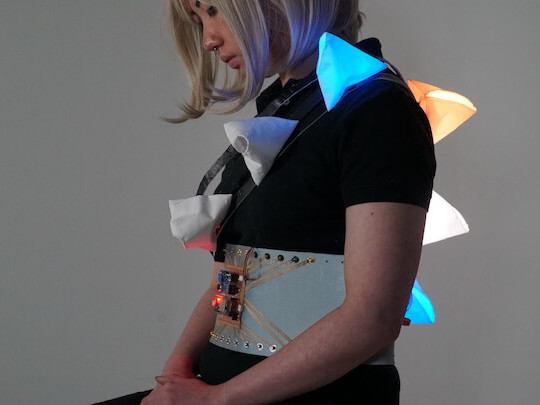
#ESP32 #WS2812B #Sewing #PCB Milling #Conductive Fabrics
Assignments: (Individual) 1. Design and produce something with a digital fabrication process (incorporating computer-aided design and manufacturing) not covered in another assignment, documenting the requirements that your assignment meets, and including everything necessary to reproduce it. Possibilities include but are not limited to wildcard week examples.
Published on: Oct 22, 2020Last updated on: Jan 12, 2021
Individual Assignment: Wireless Interactive Wearable Technology
Project Video
Description
This project is called "Inner Voice" which is an e-textile project consisting of a glove connected to a bracelet as a signal sender, 8 pieces of light modules in tetrahedron shapes installed on a dress and a belt as a signal receiver. With "Inner Voice", we can express self-conscious emotions in a more polite way without ruining others’ moods whether in a party or a public space simply by using different kinds of hand gestures to light up various patterns remotely. For this project, I replaced all the jumper wires and breadboards with conductive fabrics, yarns and self-made PCB shields to make everything in order.


Concept
Sometimes there is a situation that it is embarrassing or difficult to talk about personal feelings through plain words during a conversation. Is there any way to inform others about self discomfort without offending them? According to this, I came up with an idea that is it possible to express ourselves through light controlled by our gestures?

For example, by defining certain hand gestures and matching them to specific light patterns, people can understand our current thinking, stop continuing bothering us and leave us alone for getting better.

Materials
| # | Name | Source | Description |
|---|---|---|---|
| 1 | NodeMCU-32S ESP32 | DigiKey | Connected to a bracelet, used for detecting the finger movement with touch sensors and sends signal to the other ESP32 microcontroller connected to a belt. |
| 2 | Adafruit HUZZAH32 Feather Board | DigiKey | Connected to a belt and used for triggering triangular light modules. |
| 3 | Flora RGB Smart NeoPixel version 2 | Adafruit | Sewed on the surface of light modules. |
| 4 | 3.7/4.2V Li-Po Battery * 2 | Adafruit | For portable purpose. |
| 5 | Li-Po Battery Charger | SparkFun | - |
| 6 | Conductive Fabrics | Adafruit | - |
| 7 | Conductive Yarn/Thread | Adafruit | Used for replacing jumper wires. |
| 8 | Sewing Machine, Needles | Workshop | - |
Build
ESP32 + A Glove
After the concept presentation, I started to make a glove with a simple pattern to test if one of my ESP32 microcontrollers can read any analog values from my gestures and then send the signal to the other ESP32 board to light up a LED. The video and images below show that the LED is lighted up when I press my thumb.


Glove Fabrication
The simple pattern I made for the glove:

I ironed some conductive fabrics on the surface of the glove:

2 ESP32 Shields + 1 MP3 Shield
The detailed steps of designing a PCB can be found from Week 6: Electronics Design.
Shield Deign
After confirming how many input and output pins I am going to use for my project and finishing some rough testing with Arduino, breadboards, jumper wires and a standard neopixel strip, I started to design each of the PCB shields in KiCad software by first connecting wires in the schematic view, defining the size of electronics and then placing each of the components at suitable position in the PCB view.
The main ESP32 shield for the belt controller (receiver) in the schematic view:

The main ESP32 shield (left) for the bracelet controller (sender) and the mp3 shield for the belt controller (right) in the PCB view: I made the yellow holes big enough for hand sewing during the post-processing.

The main ESP32 shield for the belt controller (receiver) in the PCB view:

Shield Fabrication
The detailed steps of milling a PCB can be found from Week 4: Electronics Production.
After finishing designing my shields in KiCad software, the fabrication steps of my PCB shields were that first I milled the boards with a CNC machine, debugged the milled traces with a multimeter and then soldered certain headers on them. I fabricated 3 different shields which took me 12 hours in total to wait and do the post-processing.
The main ESP32 shield for the bracelet controller (sender):


The main ESP32 shield for the belt controller (receiver) :


The mp3 shield (not used) for the belt controller:


Programming
How to set up the programming environment for ESP32 can be found from Week 13: Networking and Communications.
After finishing the fabrication, I connected the ESP32 microcontrollers to my customized shields and uploaded the code to the boards to test if the light patterns I defined work correctly with a standard neopixel strip connected by alligator clips.

ESP32 Sender (the bracelet cntroller)
#include <esp_now.h>
#include <WiFi.h>

// REPLACE WITH YOUR RECEIVER MAC Address
uint8_t broadcastAddress[] = {0x24, 0x6F, 0x28, 0x7A, 0xA0, 0xF4};

#define THUMB 27 //ADC pin: analog (0-4095)
#define POINTER 32
#define MIDDLE_FINGER 15
#define RING_FINGER 14
#define PINKY 33

const int touchPinArray[5] = {THUMB, POINTER, MIDDLE_FINGER, RING_FINGER, PINKY};
int touchValInArray[5] = {0};
int touchValOutArray[5] = {0};

//const int threshold = 35;
const int rangeMax = 25; //25, 40
const int rangeMin = 0; //20

// callback when data is sent
void OnDataSent(const uint8_t *mac_addr, esp_now_send_status_t status) {
  Serial.print("\r\nLast Packet Send Status:\t");
  Serial.println(status == ESP_NOW_SEND_SUCCESS ? "Delivery Success" : "Delivery Fail");
}

void setup() {
  // Init Serial Monitor
  Serial.begin(115200);

  // Set device as a Wi-Fi Station
  WiFi.mode(WIFI_STA);

  // Init ESP-NOW
  if (esp_now_init() != ESP_OK) {
    Serial.println("Error initializing ESP-NOW");
    return;
  }

  // Once ESPNow is successfully Init, we will register for Send CB to
  // get the status of Trasnmitted packet
  esp_now_register_send_cb(OnDataSent);

  // Register peer
  esp_now_peer_info_t peerInfo;
  memcpy(peerInfo.peer_addr, broadcastAddress, 6);
  peerInfo.channel = 0;
  peerInfo.encrypt = false;

  // Add peer
  if (esp_now_add_peer(&peerInfo) != ESP_OK){
    Serial.println("Failed to add peer");
    return;
  }
}

void loop() {
  // this for loop works correctly with an array of any type or size
  for (byte i = 0; i < (sizeof(touchPinArray) / sizeof(touchPinArray[0])); i++) {
    touchValInArray[i] = touchRead(touchPinArray[i]);
//    touchValInArray[i] = (touchRead(touchPinArray[i]) > rangeMax) ? rangeMax : touchRead(touchPinArray[i]);
    touchValOutArray[i] = map(touchValInArray[i], rangeMax, rangeMin, 0, 255);
    Serial.print("Send Finger ");
    Serial.print(i+1);
    Serial.print(": ");
    Serial.println(touchValInArray[i]);
  }

  // Send message via ESP-NOW
  esp_err_t result = esp_now_send(broadcastAddress, (uint8_t *) &touchValInArray, sizeof(touchValInArray));

  if (result == ESP_OK) {
    Serial.print("Sent with success, Button State: ");
  }
  else {
    Serial.println("Error sending the data");
  }
  delay(200);
}
ESP32 Receiver (the belt controller)
#include <esp_now.h>
#include <WiFi.h>
#include <analogWrite.h>

int fingerData[5] = {0}; // THUMB, POINTER, MIDDLE_FINGER, RING_FINGER, PINKY
const int threshold = 23;

#include <FastLED.h>
//#define MAX_POWER_MILLIAMPS 500
#define BRIGHTNESS          150
#define NUM_LEDS 8
#define DATA_PIN 12
CRGB leds[NUM_LEDS];

#define UPDATES_PER_SECOND 100
CRGBPalette16 currentPalette;
TBlendType    currentBlending;

extern CRGBPalette16 myRedWhiteBluePalette;
extern const TProgmemPalette16 myRedWhiteBluePalette_p PROGMEM;


// callback function that will be executed when data is received
void OnDataRecv(const uint8_t * mac, const uint8_t *incomingData, int len) {
  memcpy(&fingerData, incomingData, sizeof(fingerData));
  // this for loop works correctly with an array of any type or size
  for (byte i = 0; i < (sizeof(fingerData) / sizeof(fingerData[0])); i++) {
    Serial.print("Get Finger ");
    Serial.print(i+1);
    Serial.print(": ");
    Serial.println(fingerData[i]);
  }

  if (fingerData[0] <= threshold && fingerData[1] > threshold && fingerData[2] > threshold && fingerData[3] > threshold && fingerData[4] > threshold) {
    for (int i=0; i<NUM_LEDS; i++) {
      leds[i] = CRGB::Red;
      FastLED.show();
    }
  }else if (fingerData[1] <= threshold && fingerData[0] > threshold && fingerData[2] > threshold && fingerData[3] > threshold && fingerData[4] > threshold) {
    for (int i=0; i<NUM_LEDS; i++) {
      leds[i] = CRGB::Blue;
      FastLED.show();
    }
  }else if (fingerData[2] <= threshold && fingerData[0] > threshold && fingerData[1] > threshold && fingerData[3] > threshold && fingerData[4] > threshold) {
    for (int i=0; i<NUM_LEDS; i++) {
      leds[i] = CRGB::Green;
      FastLED.show();
    }
  }else if (fingerData[3] <= threshold && fingerData[0] > threshold && fingerData[1] > threshold && fingerData[2] > threshold && fingerData[4] > threshold) {
    for (int i=0; i<NUM_LEDS; i++) {
      leds[i] = CRGB::Yellow;
      FastLED.show();
    }
  }else if (fingerData[4] <= threshold && fingerData[0] > threshold && fingerData[1] > threshold && fingerData[2] > threshold && fingerData[3] > threshold) {
    for (int i=0; i<NUM_LEDS; i++) {
      leds[i] = CRGB::Pink;// Green, Blue, Red
      FastLED.show();
    }
  }// FirstLight
  else if (fingerData[1] <= threshold && fingerData[3] <= threshold && fingerData[0] > threshold && fingerData[2] > threshold && fingerData[4] > threshold) {
    for(int whiteLed = 0; whiteLed < NUM_LEDS; whiteLed = whiteLed + 1) {
      leds[whiteLed] = CRGB::White;
      FastLED.show();
      delay(100);
      leds[whiteLed] = CRGB::Black;
   }
  }// ColorPalette
  else if (fingerData[2] <= threshold && fingerData[3] <= threshold && fingerData[0] > threshold && fingerData[1] > threshold && fingerData[4] > threshold) {
    ChangePalettePeriodically();

    static uint8_t startIndex = 0;
    startIndex = startIndex + 1; /* motion speed */

    FillLEDsFromPaletteColors( startIndex);

    FastLED.show();
    FastLED.delay(1000 / UPDATES_PER_SECOND);
  }// Cylon
  else if (fingerData[1] <= threshold && fingerData[2] <= threshold && fingerData[3] <= threshold && fingerData[0] > threshold && fingerData[4] > threshold) {
    static uint8_t hue = 0;
    for(int i = 0; i < NUM_LEDS; i++) {
      leds[i] = CHSV(hue++, 255, 255);
      FastLED.show();
      fadeall();
      delay(10);
    }
    for(int i = (NUM_LEDS)-1; i >= 0; i--) {
      leds[i] = CHSV(hue++, 255, 255);
      FastLED.show();
      fadeall();
      delay(10);
    }
  }else {
    for (int i=0; i<NUM_LEDS; i++) {
      leds[i] = CRGB::Black;
      FastLED.show();
    }
  }
}

void setup() {
  FastLED.addLeds<WS2812B, DATA_PIN, GRB>(leds, NUM_LEDS);  // GRB ordering is typical
//  FastLED.setMaxPowerInVoltsAndMilliamps(5, MAX_POWER_MILLIAMPS);
  FastLED.setBrightness(BRIGHTNESS);

  currentPalette = RainbowColors_p;
  currentBlending = LINEARBLEND;

  // Initialize Serial Monitor
  Serial.begin(115200);

  // Set device as a Wi-Fi Station
  WiFi.mode(WIFI_STA);

  // Init ESP-NOW
  if (esp_now_init() != ESP_OK) {
    Serial.println("Error initializing ESP-NOW");
    return;
  }

  // Once ESPNow is successfully Init, we will register for recv CB to
  // get recv packer info
  esp_now_register_recv_cb(OnDataRecv);
}

void loop() {

}
void fadeall() { for(int i = 0; i < NUM_LEDS; i++) { leds[i].nscale8(250); } }

void FillLEDsFromPaletteColors( uint8_t colorIndex)
{
    uint8_t brightness = 255;

    for( int i = 0; i < NUM_LEDS; i++) {
        leds[i] = ColorFromPalette( currentPalette, colorIndex, brightness, currentBlending);
        colorIndex += 3;
    }
}

void ChangePalettePeriodically()
{
    uint8_t secondHand = (millis() / 1000) % 60;
    static uint8_t lastSecond = 99;

    if( lastSecond != secondHand) {
        lastSecond = secondHand;
        if( secondHand ==  0)  { currentPalette = RainbowColors_p;         currentBlending = LINEARBLEND; }
        if( secondHand == 10)  { currentPalette = RainbowStripeColors_p;   currentBlending = NOBLEND;  }
        if( secondHand == 15)  { currentPalette = RainbowStripeColors_p;   currentBlending = LINEARBLEND; }
        if( secondHand == 20)  { SetupPurpleAndGreenPalette();             currentBlending = LINEARBLEND; }
        if( secondHand == 25)  { SetupTotallyRandomPalette();              currentBlending = LINEARBLEND; }
        if( secondHand == 30)  { SetupBlackAndWhiteStripedPalette();       currentBlending = NOBLEND; }
        if( secondHand == 35)  { SetupBlackAndWhiteStripedPalette();       currentBlending = LINEARBLEND; }
        if( secondHand == 40)  { currentPalette = CloudColors_p;           currentBlending = LINEARBLEND; }
        if( secondHand == 45)  { currentPalette = PartyColors_p;           currentBlending = LINEARBLEND; }
        if( secondHand == 50)  { currentPalette = myRedWhiteBluePalette_p; currentBlending = NOBLEND;  }
        if( secondHand == 55)  { currentPalette = myRedWhiteBluePalette_p; currentBlending = LINEARBLEND; }
    }
}

void SetupTotallyRandomPalette()
{
    for( int i = 0; i < 16; i++) {
        currentPalette[i] = CHSV( random8(), 255, random8());
    }
}

void SetupBlackAndWhiteStripedPalette()
{
    // 'black out' all 16 palette entries...
    fill_solid( currentPalette, 16, CRGB::Black);
    // and set every fourth one to white.
    currentPalette[0] = CRGB::White;
    currentPalette[4] = CRGB::White;
    currentPalette[8] = CRGB::White;
    currentPalette[12] = CRGB::White;
}

void SetupPurpleAndGreenPalette()
{
    CRGB purple = CHSV( HUE_PURPLE, 255, 255);
    CRGB green  = CHSV( HUE_GREEN, 255, 255);
    CRGB black  = CRGB::Black;

    currentPalette = CRGBPalette16(
                                   green,  green,  black,  black,
                                   purple, purple, black,  black,
                                   green,  green,  black,  black,
                                   purple, purple, black,  black );
}

const TProgmemPalette16 myRedWhiteBluePalette_p PROGMEM =
{
    CRGB::Red,
    CRGB::Gray, // 'white' is too bright compared to red and blue
    CRGB::Blue,
    CRGB::Black,

    CRGB::Red,
    CRGB::Gray,
    CRGB::Blue,
    CRGB::Black,

    CRGB::Red,
    CRGB::Red,
    CRGB::Gray,
    CRGB::Gray,
    CRGB::Blue,
    CRGB::Blue,
    CRGB::Black,
    CRGB::Black
};
Bracelet Fabrication
After that, I ironed some conductive fabrics in linear shape on the surface of the bracelet and belt controllers, handsewed the shields with conductive yarns and installed snap buttons for removability. For this project, I prefer to make every element removable so that I can flexibly replace or add new components without tearing down the existing ones.


8 Triangular Light Modules Fabrication
For the light modules, I applied a simple pattern which requires only one piece of fabrics to form a triangular pyramid. I first sewed the triangular structure, measured the position of the light PCB, ironed conductive fabrics, handsewed the PCB and then installed 4 snap buttons in each of the light modules.


Integration
After finishing all of the elements, I connected the glove to the bracelet controller, integrated the light module strip with the belt controller and then started to debug if there is any problem with the software or hardware part.


Photoshooting
In order to document this e-textile project properly, I booked Open Photostudio for documenting/photographing my wearable technology project (including a glove, a bracelet, a belt and 8 pieces of light modules installed on a dress) which I needed to finish within 3 weeks. Applying three-point lighting techniques learnt from videos on YouTube in real world situations are interesting and different from reproducing them in an animation. However, it is a bit difficult to photograph the color of the lighting modules and focus on the model’s details at the same time with some dim light on.


Interaction
For the interaction, I defined 5 gestures vs. 5 light patterns for the project. 2 of them are difficult to distinguish from static pictures but easier to tell the difference from the project video shown above.
The first gesture is by pressing the thumb, all the modules are lighted up in red color.

Then by pressing the pointer, all the modules are lighted up in blue.

And then by pressing the middle finger, all the modules are lighted up in green.

The fourth one is that by pressing the pointer and the ring finger, there will be a white light going through each module for a while.

The fifth one is that by pressing the pointer, middle and ring fingers, all the modules are lighted up in slowly changing colors.
Exhibition
The project was also on display in the lobby of Väre arts building at Aalto University starting from October 22 until November 5.


The interaction video from one audience:

Interacting with the light modules by touching the snap buttons intalled on the bracelet:
My e-textile project and I:

